
Content Operations
AI Images for SEO: OG, Hero and Blog Images in Codex
Generate OG cards, hero images and blog visuals with Codex and Gemini, then ship them right: WebP, alt text, file names, og:image tags and schema.
AI images for SEO only help when they leave the generator ready to publish: the right shape for where they appear, a file small enough to load fast, and alt text and markup that search engines and social networks can read. In Codex, the Codex SEO kit's $seo image-gen [use-case] <desc> and the Codex Blog kit's $blog image [generate|edit|setup] create OG cards, hero images, product shots and blog illustrations with Gemini, then hand you the SEO checklist and the code to wire each image in. This guide covers which image each page needs, how the commands turn a one-line idea into a detailed prompt, what you get back, and how Codex puts the finished files into your project.
Key takeaways
$seo image-genhas subcommands for OG cards, hero images, product photos, infographics, custom images and batches. Each SEO use case comes with its own aspect ratio, resolution and style mode.$blog imagegenerates and edits blog images, writes alt text, and gives you a front matter snippet for the cover and OG image.- Neither command sends your words to the model as typed. Both expand your idea into a six-part brief: subject, action, context, composition, lighting and style.
- Generation needs a Google AI API key and the kit's image setup, and Google's Gemini pricing applies. The skill shows an estimated cost before it generates, especially for batches.
- After every image, the skill walks through alt text, file name, WebP conversion, file size,
ImageObjectschema and OG tags. Codex can do each step in your repository.
The image commands at a glance
| Item | Details |
|---|---|
| Command | $seo image-gen [use-case] <desc> for SEO assets, $blog image with generate, edit or setup for blog posts |
| What you give it | A use case and a short description, an image idea, or the path of an image to edit |
| What Codex uses | Gemini image generation through an MCP server that the kit's image setup connects, plus presets for each use case |
| What you get back | The image and its saved path, the full prompt sent, the settings used, an SEO checklist, and markup such as ImageObject JSON-LD, OG tags or front matter |
| Needs | The image extension or $blog image setup, a Google AI API key, and internet access. Google's pricing applies to every image |
| Best for | Missing OG images, blog covers, inline illustrations, and product or schema images |
Why images matter for SEO and sharing
Images decide how a shared link looks, shape how fast the page loads, and give search engines another way to understand the page. A generated image that ignores any of the three can cost more than it adds.
OG images control how a shared link looks
When someone pastes your URL into a chat app or social network, the preview card usually comes from the page's Open Graph tags, with og:image pointing at the picture. Without it, platforms guess or show nothing. The widely used size is 1200 by 630 pixels, and both kits treat that as the OG standard. The SEO kit's image agent also checks existing OG images against that minimum during a full audit.
Hero images and page speed
A large hero is often the element that Largest Contentful Paint measures. Google's Core Web Vitals count an LCP of 2.5 seconds or less as good, and a heavy hero works against that. The skill targets under 200 KB for heroes and under 100 KB for thumbnails, and its checklist includes converting to WebP, which is usually far smaller than PNG at similar quality.
Schema images and image search
Article and BlogPosting markup takes an image property, and an ImageObject describes a picture with its URL, width, height and caption. Google also reads alt text, file names and surrounding text to understand an image, as its image SEO best practices explain, so the checklist covers words as well as pixels.
Charts are drawn, not generated
Exact numbers need a different tool. When $blog write or $blog rewrite finds chart-worthy data, such as three or more comparable figures, a trend or a before-and-after pair, the Codex Blog kit builds an inline SVG chart instead of asking an image model to paint one. The chart type follows the data (grouped bars for before and after, a line for a trend, a donut for parts of a whole) and never repeats within a post. Each chart works in light and dark themes, carries accessible labels, cites its source, and must match the source values exactly. Use the infographic preset for visual overviews, and keep precise figures in SVG.
How $seo image-gen runs inside Codex
Type $seo image-gen og "project management dashboard for small teams" and the skill follows the same pipeline for every request:
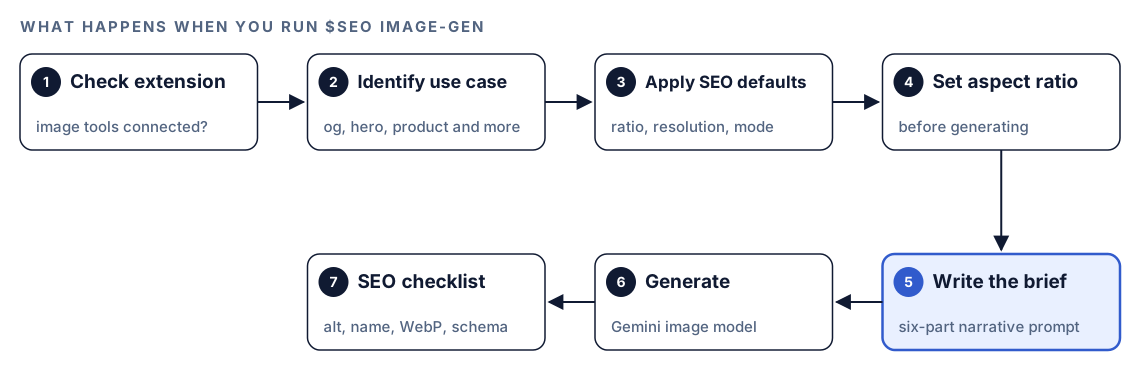
- Check the extension. The skill confirms the image tools are connected, or tells you how to install them.
- Identify the use case. It reads the use case from your command, or from context when you just describe what you need.
- Apply SEO defaults. Each use case maps to a preset aspect ratio, resolution and domain mode, the style lens for the prompt. A saved brand preset loads too.
- Set the aspect ratio. It's set first, so the image is composed for its final shape.
- Write the brief. The skill builds a detailed prompt from the six-part brief below, describing what the camera sees.
- Generate. The prompt goes to Gemini's image model, and the file is saved.
- Run the SEO checklist. You get guidance on alt text, file naming, WebP conversion, file size, schema and OG tags.
SEO defaults for each use case
| Use case | Aspect ratio | Resolution | Domain mode |
|---|---|---|---|
| OG or social preview | 16:9 | 1K | Product or UI/Web |
| Blog hero | 16:9 | 2K | Cinema or Editorial |
| Schema image | 4:3 | 1K | Product |
| Social square | 1:1 | 1K | UI/Web |
| Product photo | 4:3 | 2K | Product |
| Infographic | 2:3 | 4K | Infographic |
| Favicon or icon | 1:1 | 512 | Logo |
| Pinterest pin | 2:3 | 2K | Editorial |
$blog image has its own presets for posts: covers at 16:9 in 2K or 4K, OG cards at 16:9 in 1K, inline illustrations at 16:9 or 4:3, and wide section dividers at 8:1 or 4:1. Covers come out at 1200 by 630 or 1920 by 1080, and inline images at least 1200 pixels wide.
The six-part brief
Both commands act as a creative director: they never pass your raw words to the model. A request like "hero image for a post about remote work" becomes a narrative prompt built from six parts.
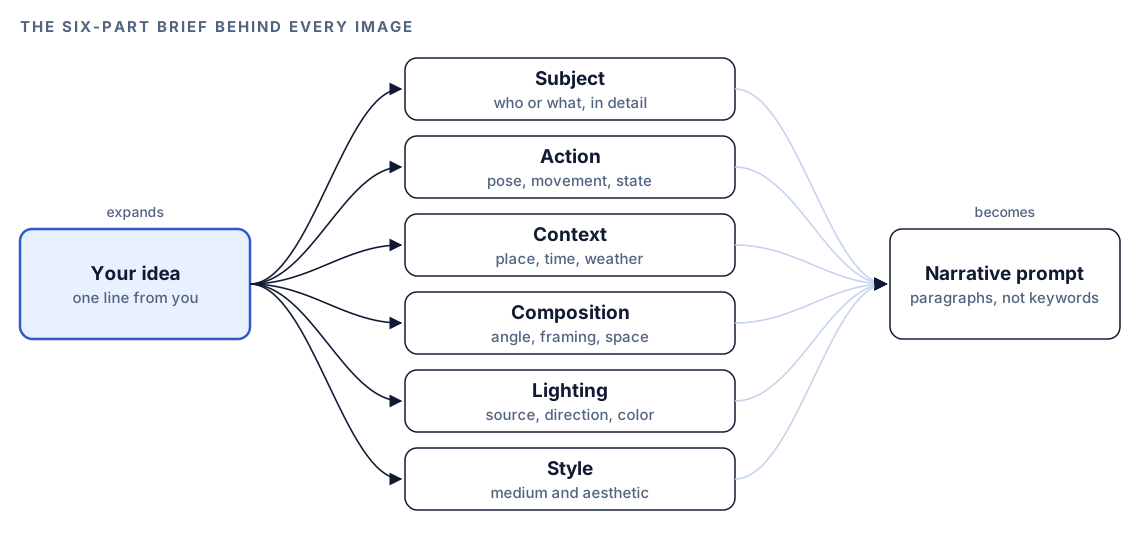
- Subject: who or what is in the frame, with physical detail such as materials, textures and scale.
- Action: what's happening, such as a pose, a gesture or a state.
- Context: the setting, time of day, season and weather.
- Composition: camera angle, shot type, framing and negative space.
- Lighting: the light source, its direction, quality and color temperature.
- Style: the medium and look, such as editorial photography or flat illustration.
The brief is written as natural paragraphs, never a keyword list, and the blog skill names missing lighting detail as the usual cause of a weak result. The response shows the full prompt it sent, so you can reuse what works.
Run it in Codex, step by step
- Install the kits from the install section, restart Codex, and open a new task in your site's project.
- Set up image generation. For the SEO kit, install the image extension that ships with it. For the Blog kit, run
$blog image setup, which configures the MCP server and your Google AI API key and needs Node.js 18 or later. You get the key from Google AI Studio, and Google's pricing applies to each image. Restart Codex afterward. - Check your permission mode. Generation calls Google's API over the internet, so depending on your mode, Codex may ask first. Approve it for this task.
- Generate SEO assets with a use case and a description:
$seo image-gen og "project management dashboard for small teams, calm blue palette"
$seo image-gen hero "remote team planning a product launch around a kitchen table"
$seo image-gen product "matte black insulated water bottle on a white background"
$seo image-gen batch "abstract header for a pricing page" 3
batch makes several variations, three by default, and the cost estimate shown first is worth reading. custom runs the full creative brief for anything the presets don't cover.
- For blog posts, generate or edit:
$blog image generate "cover for a post on cutting cloud costs, editorial style"
$blog image edit public/blog/cloud-costs/cover.png "make it warmer and crop for social"- Or ask in plain language. Codex picks the skill when your request matches it:
Create an OG image for our pricing page at 1200x630 that matches the site's blue and white palette. Then give me the og:image tags and alt text.Edits get the same treatment: "make it warmer" becomes a specific color temperature shift with notes on what to keep. When an image is mostly right, the blog skill prefers a conversational edit over a fresh start. If the safety filter blocks a harmless prompt, it rephrases and retries up to three times before reporting back.
What you get back
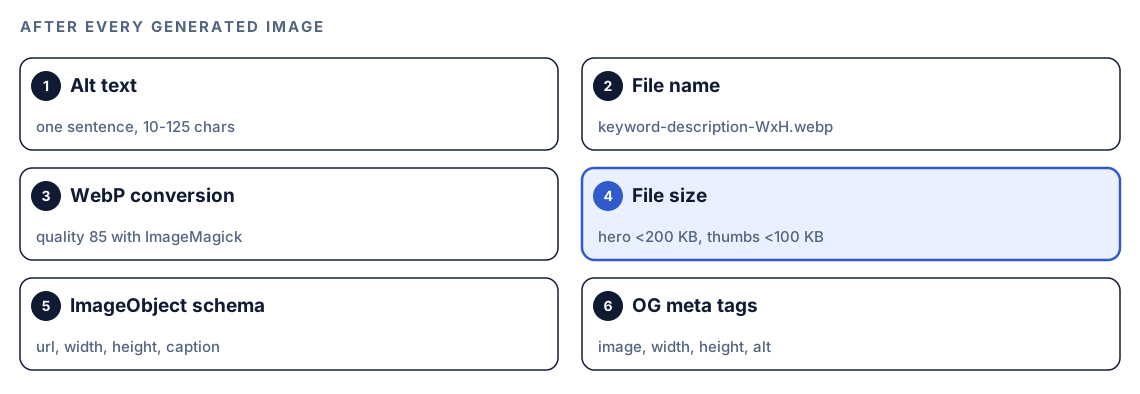
After each image, $seo image-gen reports the saved path, the crafted prompt, the settings (model, aspect ratio and resolution), the SEO checklist and an ImageObject or og:image snippet. $blog image adds alt text, a front matter snippet for hero and OG images, and refinement ideas.
The post-generation checklist
- Alt text. A descriptive sentence of 10 to 125 characters that says what the image shows and why it's there.
- File name. A pattern such as
keyword-description-widthxheight.webp. - WebP and size. Convert the output, then keep heroes under 200 KB and thumbnails under 100 KB.
- Markup. An
ImageObjectwith URL, width, height and caption, and for social images,og:imagewith its width, height and alt text.
What the audit side reports
The SEO kit also has an image analyst agent that runs during $seo audit. To keep costs under control, it never generates anything. It checks each page for an og:image tag, OG images of at least 1200 by 630, populated ImageObject properties, alt text quality, modern formats and file sizes, then writes a plan:
### Image Audit Summary
| Metric | Value | Status |
|---|---|---|
| Pages with OG images | X/Y | Pass/Fail |
| OG images correct size | X/Y | Pass/Fail |
| WebP/AVIF adoption | XX% | Pass/Fail |

### Image Generation Plan
| Page | Issue | Suggested use case | Prompt idea | Priority |
|---|---|---|---|---|
| /pricing | Missing OG image | og | [contextual suggestion] | Critical |
| /blog/[post] | Low-res hero | hero | [contextual suggestion] | High |
Work from Critical down, starting with your highest-traffic pages, as the agent recommends. Each row translates straight into an $seo image-gen command. Our guide to the full SEO audit in Codex shows where this sits in the larger report.
Apply the fixes with Codex
A generated file sitting in a downloads folder helps nobody. Codex can crop, convert, rename, place and reference it in the same task. The skills use ImageMagick for the file work:
magick og-pricing.png -resize 1200x630^ -gravity center -extent 1200x630 og-pricing-1200x630.png
magick og-pricing-1200x630.png -quality 85 og-pricing-1200x630.webp
Then the tags in the page head, with an absolute URL:
<meta property="og:image" content="https://example.com/images/og-pricing-1200x630.webp" />
<meta property="og:image:width" content="1200" />
<meta property="og:image:height" content="630" />
<meta property="og:image:alt" content="Pricing table comparing Example's three plans for small teams" />
Where the page has structured data, add an ImageObject:
{
  "@type": "ImageObject",
  "url": "https://example.com/images/og-pricing-1200x630.webp",
  "width": 1200,
  "height": 630,
  "caption": "Pricing plans for small teams compared side by side"
}
For a blog post, the front matter snippet goes at the top of the file:
coverImage: "/images/blog/cloud-costs-cover-1200x630.webp"
coverImageAlt: "Engineer reviewing a cloud cost dashboard with spending trending down"
ogImage: "/images/blog/cloud-costs-cover-1200x630.webp"
Field names depend on your content schema, so have Codex match what your templates read. Then give it the whole job:
I generated a new OG image for /pricing. Crop it to 1200x630, convert it to WebP under 200 KB, name it og-pricing-1200x630.webp, and put it in our public images folder. Add og:image, og:image:width, og:image:height and og:image:alt tags to the pricing page through the existing layout or metadata code, and add an ImageObject to the page's JSON-LD if it has any. Show me the diff, then run the build.In the diff, check for an absolute URL, the real dimensions, and alt text that describes this image. After deploy, preview the link to confirm the card. For alt text, formats and lazy loading on existing images, see image SEO with Codex, and for the JSON-LD side, schema markup with Codex.
Make it repeatable
Image standards slip quietly: a huge PNG cover, a relative OG path, alt text that says "image". A short AGENTS.md section keeps Codex applying the same rules whenever it touches an image:
## Images
- Every new blog post gets a 1200x630 WebP cover that doubles as the OG image.
- File names: keyword-description-widthxheight.webp, lowercase, hyphens only.
- Size limits: hero and cover under 200 KB, thumbnails under 100 KB.
- Alt text is one descriptive sentence of 10 to 125 characters, never a keyword list.
- og:image URLs are absolute and come with width, height and alt tags.
- Use $blog image generate for covers. Show the cost estimate and ask before any batch.
- Charts with real data are inline SVG, never generated images.
Codex reads AGENTS.md before it starts work, so these rules apply to every future task. Keep it short, because combined instructions have a size cap. Our guide to AGENTS.md rules for SEO shows how to organize a fuller file.
Without the skill: a plain Codex prompt
Without an image model connected, Codex can still write the brief and handle every step after generation:
Read content/blog/cloud-costs.md, then write an image generation prompt for its hero image. Describe the subject with physical detail, the action, the setting, the camera angle and framing, the lighting and the style, as two natural paragraphs, not a keyword list. The image will run at 16:9 and be cropped to 1200x630 for social cards.Then, once you have the file:
Take images/raw/cloud-costs.png. Crop it to 1200x630, convert it to WebP at quality 85, name it cloud-costs-cover-1200x630.webp, write alt text of 10 to 125 characters, and set it as the cover and OG image in the post's front matter. Show me the diff.What the skill adds is the pipeline in one place: use-case presets, the same six-part brief every time, cost estimates, safety-filter retries, an edit mode that keeps what works, and the SEO checklist and markup after every image.
Pitfalls to avoid
- Generating an OG image but never adding the
og:imagetags, or adding them with a relative URL. - Publishing the raw PNG instead of a WebP file under the size target.
- Writing alt text as a string of keywords instead of a sentence about the image.
- Asking an image model to draw a chart of real numbers. Use an SVG chart that matches the source.
- Running a large batch without reading the cost estimate first.
- Using a generated product photo that doesn't show the real item accurately.
Keep going
- Image SEO with Codex audits the images you already have for alt text, size, format and lazy loading.
- Write a blog post with Codex shows where covers and charts fit into the writing workflow.
- Schema markup with Codex covers the
ImageObjectand BlogPosting markup that points at your images. - See every command in both kits, including the rest of the Codex Blog tools.
FAQ
What size should an OG image be?
1200 by 630 pixels is the widely used size, and it's what both Codex kits produce for OG and social preview cards. Add og:image:width and og:image:height tags with the real dimensions, use an absolute URL, and keep the file small, ideally as WebP.
Are AI-generated images bad for SEO?
Not in themselves. Google's image guidance focuses on relevance and context: descriptive alt text, a sensible file name, helpful surrounding text and a fast file. Use real photos where accuracy matters, such as product listings.
Can Codex generate images?
With the image setup from the Codex SEO or Codex Blog kit, yes. $seo image-gen and $blog image generate send a detailed prompt to Gemini's image model through an MCP server, save the file, and walk you through alt text, file naming, WebP conversion and markup. You need a Google AI API key, and Google's pricing applies.
How do I write alt text for AI-generated images?
Describe what the image actually shows and why it's on the page, in one sentence of about 10 to 125 characters. Include a topic keyword only where it fits naturally. $blog image suggests alt text for every image, but check it against the final picture.
What is the best format for blog hero images?
WebP is the practical default: browsers support it widely, and it's usually much smaller than PNG or JPEG at similar quality. The skills aim for hero files under 200 KB. AVIF can be smaller still, and the blog skill can convert to it too.